Your Ultimate Guide to Baking Storage Ideas For an Organized Kitchen
This post is all about baking storage ideas to streamline your kitchen organization.
Baking is more than just a hobby—it’s a beautiful blend of science, art, and a bit of magic. To make the process as enjoyable and stress-free as possible, it’s important to have an organized baking storage system in place.
Whether you’re a casual cookie maker or a seasoned pastry chef, having the right storage solutions can make all the difference. I have perfected how to get all of my baking supplies to fit in my small kitchen and I know these tips will be game-changing for your space as well.
In this guide, you will learn practical and creative storage ideas that will keep your kitchen neat and your ingredients fresh!

How to save money when organizing your baking supplies using minimalist principles
- Use what you already have before buying new
- Declutter items you no longer use or are broken. Donate them, fix them, or recycle them if possible. Compost any expired items rather than trashing it.
- Try to thrift storage containers before buying items for full price. I will include links for convenience or if you can’t find what you are looking for second-hand.
- Choose baking organizers that are durable. Try to avoid plastic when possible as it breaks easily and you may have to replace it frequently.
The Best Baking Storage Ideas
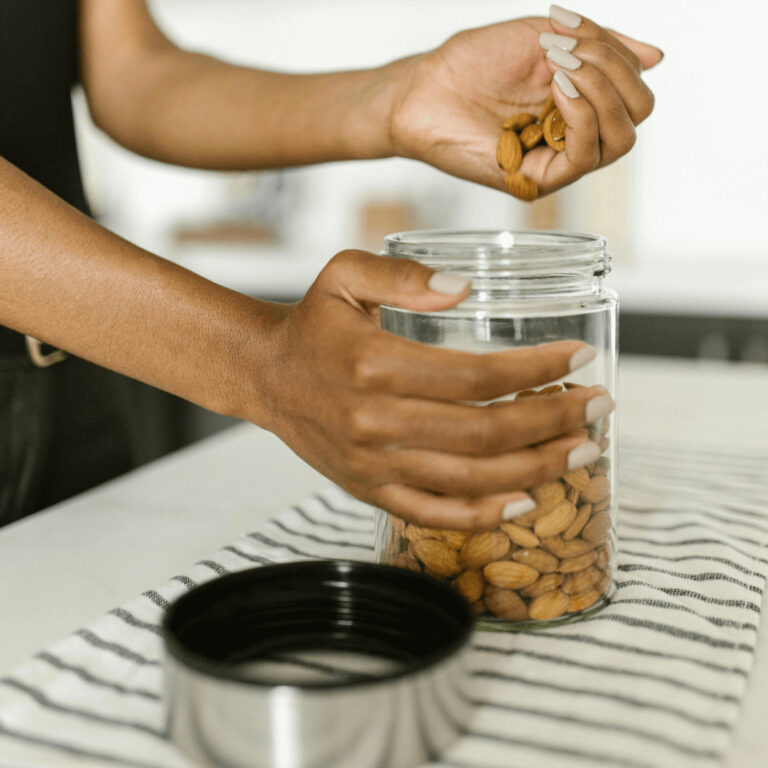
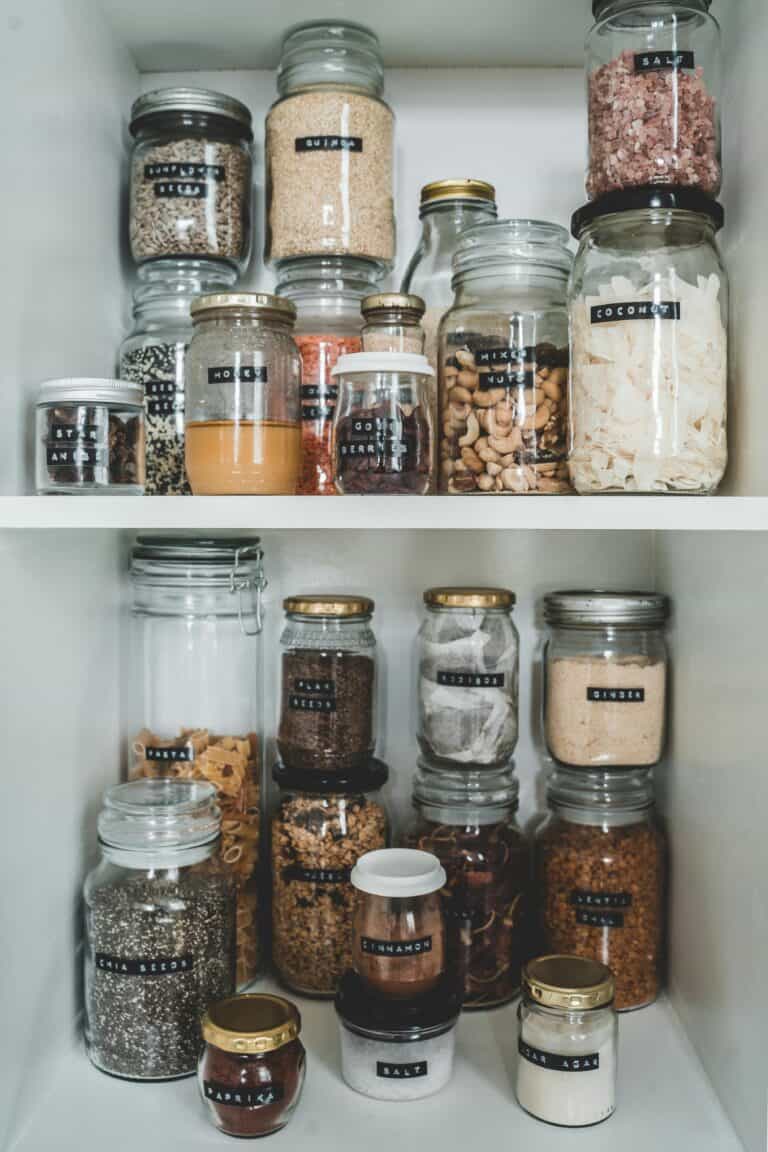
1. Choose the right baking storage containers for dry goods

Airtight containers are the most important part of storing your baking materials. This ensures everything stays fresh and you can easily find all your goodies. Keep out moisture and pests with the options below!
Glass Jars: These are not only functional but also look really beautiful. Opt for jars with wide mouths for easy scooping and clear labels to easily find what you’re looking for.
If you are storing liquid in the glass jars I suggest these lids since they don’t rust.
Plastic Bins: Perfect for larger quantities of flour, sugar, and other baking staples. Look for bins with secure, snap-on lids to prevent spillage.
Glass food storage containers: If you are trying to transition your kitchen away from plastic usage you will love these glass food containers. They have a snap-on lid that keeps things like brown sugar or chocolate chips safe from moisture thus spoilage.
Baking storage container tips:
- Store your containers in a cool, dry place to ensure everything stays fresher for longer
- Pick up some measuring cups that you can leave in the containers for convenience.
- Clear containers make things more efficient so that you can clearly see everything. Don’t feel like you need to go out and buy all new stuff though. Labels are a great alternative to clear containers.
2. Label everything and then label some more

Labeling is crucial for maintaining an organized baking pantry. It is helpful for when you are setting things up but also when your containers start to run low or things start to expire. Labels help you to quickly find what you’re looking for and restock efficiently.
Label Makers: A label maker is an investment but they are fantastic for creating professional-looking labels that will not budge!
Chalkboard Labels: These are great for a more customizable approach. You can easily update labels as needed with a chalk marker. Go for these markers rather than chalk sticks so your writing doesn’t smudge.
Labeling Tips:
- Include both the ingredient name and the expiration date.
- Choose a method that is easy to maintain. The more simple you keep it, the more likely you will be able to maintain it.
- For bulk items, create a master list with all ingredient details and expiration dates. Put it in a clear protective sleeve and store it in your pantry or kitchen drawer.
{RECOMMENDED POST: Learn 31 Best Ways To Organize Your Small Kitchen (Clutter Free Heart of the Home)}
3. Storage ideas for baking trays for easy access

Vertical organizers are the most streamlined way to store your baking trays.
Nesting baking trays into each other is an option but it starts to become annoying after a while since you have to rearrange things after washing them.
If your cabinets are tall enough you can simply slide them in vertically or pick up one of these simple dividers. This ensures there is enough space for them to stay dry, not get moldy and you can easily slide them out.
*Vertical dividers can also be helpful for pizza pans and muffin tins!
4. Baking storage for small ingredients

Things can start to feel cluttered when it comes to sprinkles, food coloring, cupcake tins, and more. Rather than stuffing them in kitchen drawers, try some of these options:
Shelf risers: these are perfect if you have deep kitchen cabinets or shelves that way you can easily access items in the back.
Rotating storage container/lazy susan: With a quick spin, you can quickly get to anything in the back of your cabinets with a simple turntable organizer.
Magnetic Containers: Attach magnetic spice jars to the side of your refrigerator or a metal board in your pantry. This can free up drawer space and make essentials easily accessible.
Over-the-Door Organizers: Use the back of your pantry or cabinet doors for extra storage. These organizers can hold smaller items like spices, baking soda, cupcake liners, or cookie cutters.
5. Store baking tools on a peg board, hooks, or in a container on your counter

Avoid storing your baking tools in your kitchen drawers at all costs! We all know those baking tools that are guaranteed to get hooked on the cabinet drawer.
This tip is of course personal preference and depends on your kitchen but consider using vertical space to hang your baking tools.
Pegboards or hooks in a pantry or cabinet are great ways to grab what you need and get to baking.
6. Keep similar baking items together and get a basket for each category

Whether you are a casual home baker or baking is a weekly hobby you engage in, you probably have a few different categories of items you bake.
Keep things simple by grouping similar items and tossing it in a basket. Label the basket and you’re good to go. Don’t rely on a catch-all kitchen drawer for baking projects.
- Cake decorating tools
- Holiday baking tools (special sprinkles, cookie cutters etc.)
- Boxes of cake mix, brownie mix, etc.
- Bread making tools
- Cookie cutters in Stasher bags
7. Use reusable bags to store dough or extra baked goods to minimize waste

I am absolutely obsessed with Stasher bags and you should be too! Rather than using plastic bags that can easily break, these silicone bags are sturdy.
You can even write on them to keep them organized in your freezer. I love using these if I prep a large batch of cookie dough and I can simply store them in the freezer for easy baking later!
{RECOMMENDED POST: 11 Genius Zero Waste Kitchen Organization Tips For a Clutter Free Home}
8. Be intentional about baking gadgets you will use for a long time and have space to store

Part of why our kitchens feel cluttered is because we simply have too much stuff.
We are all guilty of buying items on a whim and never using it. Then you find it at the back of your kitchen cabinet 4 months later perfectly untouched.
Ask yourself these questions when decluttering your kitchen:
- Will I use this often?
- Am I only buying this baking tool because it is on sale?
- Do I have the space to store this baking gadget?
- Could I use the money I am going to spend on this on more meaningful things? For example, a baking class or a unique ingredient you’ve never tried.
Don’t get me wrong, some baking gadgets are simply fun and can save space like these collapsable measuring cups. Just be mindful of how many “cool kitchen gadgets” you collect.
The fewer baking items you own the less you will have to organize!
9. Commit to regular maintenance and cleaning

An organized baking storage system relies on regular upkeep. It doesn’t have to be every week but at least every few months, give your baking storage some extra attention!
- Check expiration dates regularly. Try to compost items rather than trash them.
- Every time you finish items in a reusable container, be sure to wash it and let it dry completely. This helps to cut down on build of of residue.
- Sweep and sanitize surrounding areas. Things fall and spill but be sure to keep things tidy so you don’t get pests in your baking items.
- Reorganize as needed. Your needs may change after you start to use your new organization system and it is totally ok to rearrange items to fit your current needs.
- Get your family members and roommates involved. If everyone knows where things go it makes it way easier to maintain.
10. Create a baking center to store things if baking is your hobby
If baking is your passion why not create a little baking area in your kitchen? If you have the extra space, a rolling cart is the perfect place to keep your tools and most used baking ingredients.
You can probably thrift a rolling kitchen cart but if you can’t find one here is a great option!
A designated baking cabinet or pantry shelf works great too!
Baking ingredients storage reminders
There are honestly so many different storage options and since everyone’s kitchen is different it will require different organizers. No matter what you choose to organize your baking ingredients with keep these reminders top of mind:
- Store everything in a cool and dry place
- Keep ingredients out of direct sunlight (baking oils, vanilla extract, meltable items like chocolate etc.)
- Air-tight containers to keep out moisture (to prevent clumping and mold) and pests
- Some items can go in the freezer/fridge to extend their shelf life
Benefits of keeping your baking pantry and drawers organized
- Reduce waste by keeping track of your ingredients and avoid buying duplicates.
- Efficiency and planning: when you know where everything is you can spend more time experimenting with new recipes and enjoying your creations
- Helps ingredients last longer. Don’t waste money rebuying items every time you want to try a new recipe.
- Reduce stress. Baking can for sure be a part of your self-care routine. Making the most pleasant experience by staying organized. That way you can enjoy the moment rather than waste time sifting through misplaced items.

Enjoy the process of kitchen organization and baking!
Baking storage isn’t just about having the right containers—it’s about creating an organized and efficient system that works for you and those you share your home with.
From airtight containers to creative space-saving solutions, the goal is to keep your ingredients fresh and your kitchen running smoothly.
By using these organization strategies, you’ll set yourself up for fun baking memories and make your time in the kitchen more enjoyable.
Happy baking and organizing!
Have any other baking storage ideas? Let us know in the comments below! I’m sure others in the community would love to learn from you as well as they organize their kitchen.
Be sure to sign up for the newsletter if you would like sustainability and wellness tips sent directly to your inbox!
Stay well,
Maggie
This post was all about baking storage ideas.
Other posts you may like:
Genius Tips For How to Organize Water Bottles in Your Kitchen
Copy These Easy Apartment Kitchen Ideas for Renters
8 Genius Camping Food Storage Ideas For an Organized Camp Kitchen
If you would like to save this baking storage ideas post for later-Pin it!


One Comment
Comments are closed.