Best Loom for Beginners and Easy Potholder Tutorial
This post is all about the best loom for beginners and how to make a potholder with a loom.
If you’ve been wanting to try a cozy, beginner-friendly craft, making a potholder with a loom is the perfect place to start!
They are nostalgic (so many fun memories at summer camp, making these!) and incredibly satisfying to complete. Whether you’re new to loom weaving or need help finishing a half-made project, this guide will walk you through every step from the very first loop to taking your pot holder off the loom.
I’ll even share the best loom for beginners and other fun loom project ideas if you end up loving the process as much as I did and want to keep crafting!
Keep reading to dive into your new cozy hobby, perfect for unwinding or creating a fun DIY decor piece for your home!
This post may contain affiliate links, which means I’ll receive a commission if you purchase through my links, at no extra cost to you. Please read full disclosure for more information.

Best Loom for Beginners
The exact kit that I used for this tutorial is discontinued, but I found this one that is really similar!

I love that this beginner loom kit comes with everything you need to make a DIY potholder, scarf, socks etc.
It comes with the loom, yarn, and a few simple weaving tools as well. There are plenty of plastic looms available, but I prefer the wooden ones as they are a bit more durable.
Why loom crafts are making a comeback

There’s something so relaxing about using soft yarn to make a repetitive pattern. It’s almost meditative.
I love to grab a warm cup of tea and zone out with my loom. Not only do you end up with a cute decorative piece, but it’s also useful around your home!
Loom potholders are:
- Easy enough for beginner crafters (and kids!)
- Quick craft (most take under an hour!)
- Only require a few materials. Great to bring while traveling, camping, or waiting around.
- Perfect as a DIY gift. Homemade gifts are always so special.
- Easily customizable with color combos, charms, and more!
- They’re a great way to tune out the chaos of life and tune into the present moment. Because if you don’t, you’ll end up with a wonky potholder! Practice your patience and focus with this simple craft. It’s a great meditative practice!
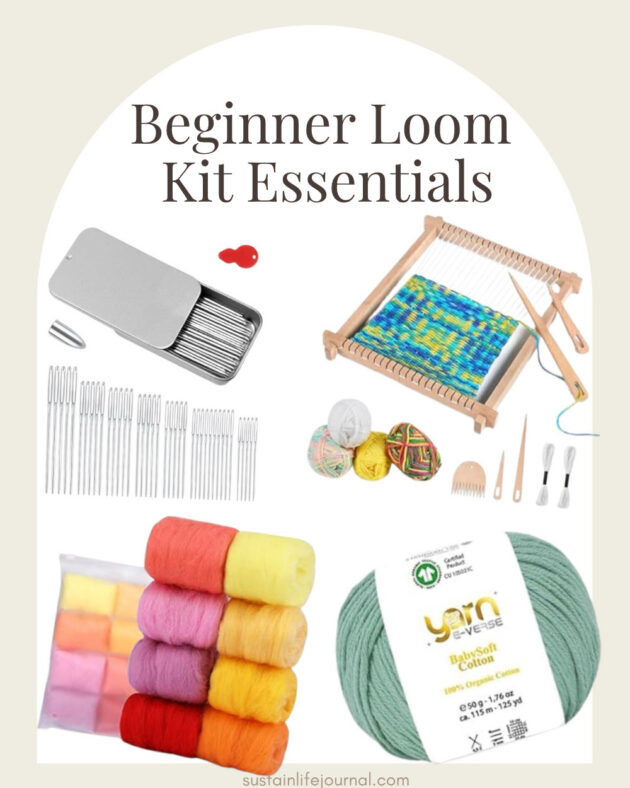
DIY Beginner potholder loom materials needed:
This craft only requires a few simple supplies!
If you would prefer to get the materials individually, here are some of my top recommendations:
- Wooden loom
- Yarn
- Weaving needles
- Optional: This fun cloud-like yarn!
- Plastic weaving needles (a bit of a safer option if kids are doing this craft)

How to Make a Potholder with a Loom (Step-by-Step Tutorial)
1. Set up your loom
Begin by laying your loom flat on a table. Make sure to collect your materials and decide what pattern you want your yarn in.
I added colors as I went, but it can be helpful to grab a pen and paper and plan it out first if you want a specific look.
2. Add your vertical loops
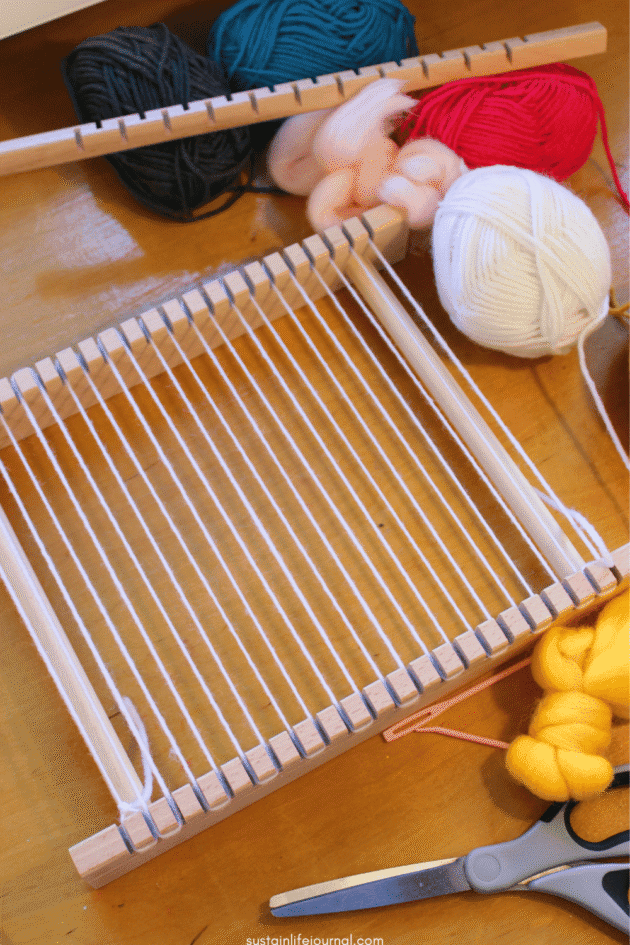
Choose a base color yarn (I used white) that will hold your pattern. Tie your yarn in the bottom left corner of your loom.

Then, begin to hook your yarn from bottom to top. Once you get to the end of the loom, you can tie another knot.
Make sure it’s nice and tight so your potholder doesn’t slide around.
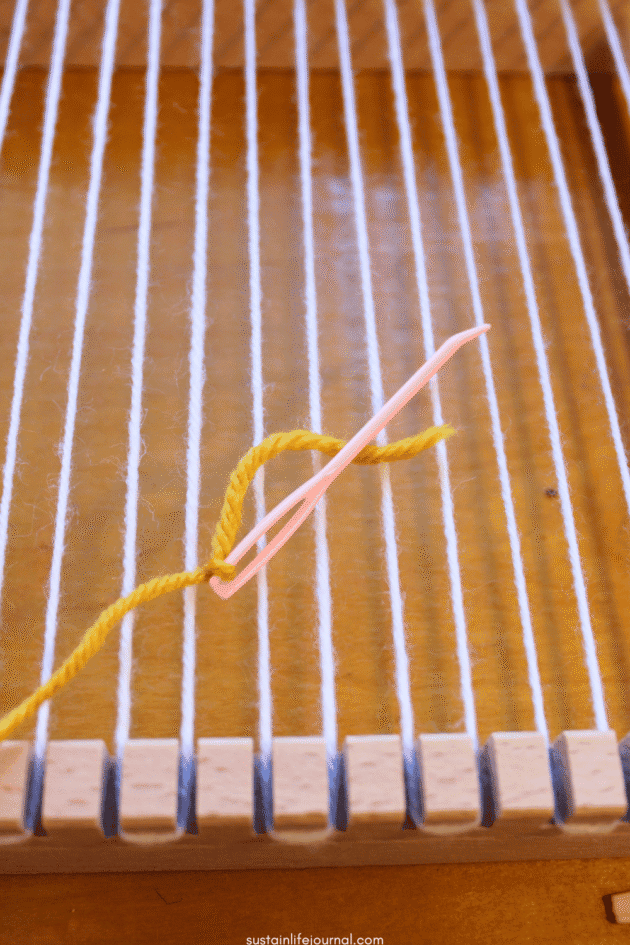
3. Weave in your pattern horizontally

Now it’s time to weave! Choose your first color and tie it onto your needle.
I did a double knot for extra security. Tie the end of it to your first vertical yarn piece. Then begin weaving in an over-under pattern.
Once you get all the way to the right side of your loom, change directions and keep going until you run out of yarn or get to the desired width of your pattern.
4. Press each horizontal row down
Gently push each horizontal layer downward towards the base of your loom. This will ensure you don’t have holes in your loom and that it looks compact and even.
If your weaving kit comes with a comb, you can also use that for this step!
5. Cut the knot tails off

You can do this as you go or wait until the end to do this. But don’t forget to cut off the tails from the knots that you make.
This will help to make it look less chaotic.
How to Finish a Potholder Loom
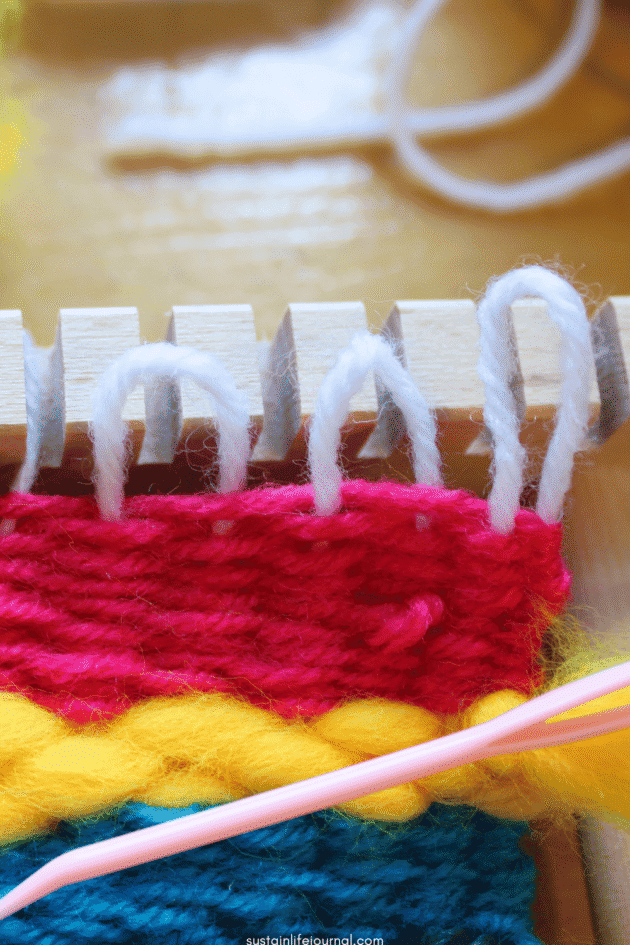
Finishing up your loom can be the most intimidating part, but once you get the hang of it, it’s pretty easy!
- Thread a new piece of yarn onto your needle. Choose a color you love because this will be exposed since it’s on the outside of your potholder.
- Gently lift the first loop on the right side off the loom. Tie the end of your yarn to this loop.
- Next, continue lifting the loops off of your loom. Start to thread your needle and yarn in an over-under pattern on each loop.
- When you get to the end, tie off your yarn to the last loop. Cut off the tails of the knots so they look clean.
- Repeat this same process on the bottom of your loom to fully remove your potholder.

FAQ’s About DIY Loom Potholders
How long does it take to make one loom potholder?
Most potholders take about 30–45 minutes once you’re familiar with the process.
It’s a great evening craft or cozy weekend activity to enjoy while you watch a show or relax in nature. Enjoy the process though, and don’t rush through it!
What kind of yarn should I use for my loom project?
Cotton yarn is the best if you’re making potholders since it can withstand heat a bit better.
Polyester ones are fine for decorative purposes, but can melt if used near hot pans. This tutorial was intended for potholders, but you can also use this process to make blankets, decorative wall art, socks etc.
Can kids make these DIY potholders too?
For sure! This is a simple craft for roughly ages 6+. They may need a little supervision during the finishing step, and if all you have is a sharp weaving needle.
These plastic weaving needles may be a bit safer for kids.
This craft helps with fine motor skills and can help your little one slow down and practice mindfulness as well (:
How do I change colors on my loom when my yarn runs out?

Simply tie a knot with a new color of yarn to the yarn you’re currently using.
This won’t look great initially, but at the end, you can cut off the little tails. The knot will also be hidden in your potholder as well so you won’t really see it.
Why is my potholder an hourglass shape?
You most likely were pulling too hard as you were weaving horizontally.
This creates too much tension and gives your potholder that hourglass shape. I did this too! It can easily happen if you’re zoning out or rushing to get to the finished product (guilty!)
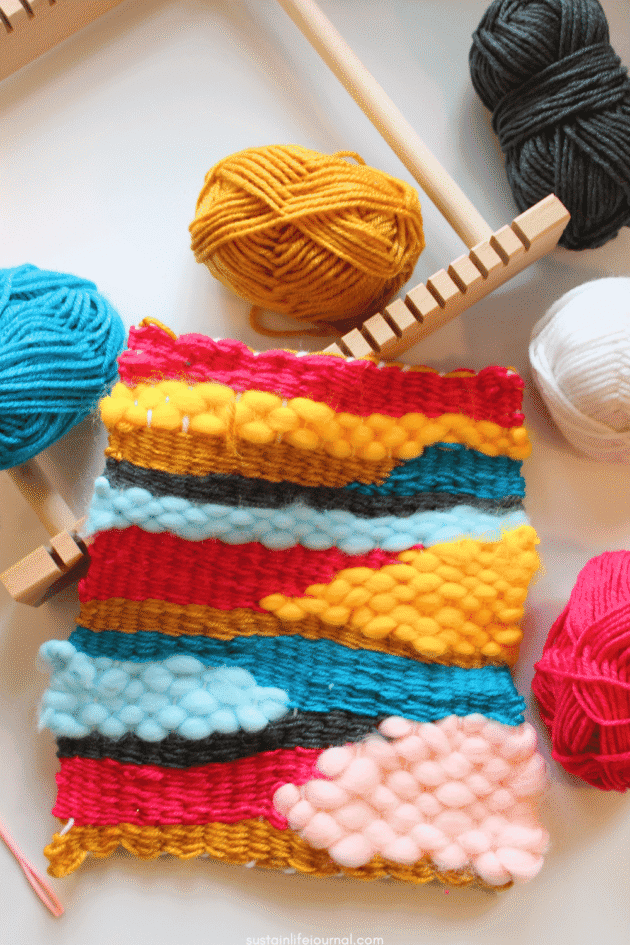
Potholder pattern ideas to try
Once you’ve made one potholder, you’ll probably want to make five more!
Here are some other potholder design ideas you can try to mix things up:
- Checkerboard: Alternate your colors (horizontally and vertically) to get a classic checkerboard look.
- Ombre: Use a gradient of similar tones starting from light to dark.
- Stripes: Alternate the horizontal colors you use. Go wide or keep the stripes narrow.
- Color blocks: split your potholder into four sections.
- Tie dye: Use multi color yarn for a fun, colorful pop of color!
- Charms: Add little charms, shells, or decor to your yarn as you weave. This may be better if you are using it as decor rather than to cook with 😉
- Random mix: Go wild and don’t plan anything specific!
Easy loom weaving project ideas
Now that you have the general process down, you can expand to other simple crafts.
Here are a few ideas to get you started:
- Coasters
- Wall art
- Bags or pouches
- Headbands, hair wraps, and scrunchies
- Woven plant hanger strips
- Reusable woven face pads (great for removing makeup!)
- Woven pet toys
- Holiday ornaments or gift tags
- Totebag
- Squares for a baby blanket
Loom weaving for beginners and easy loom project ideas
Believe it or not, you can actually make a DIY loom out of cardboard for an eco-friendly twist, but this is my recommendation for the best loom for beginners.
Making a potholder with a loom is one of those simple hobbies that brings way more joy than you might expect. It’s cozy, tactile, and lets you slow down, even if it’s just for 30 minutes! The best part is that you’re left with something beautiful and functional when you’re done.
So, whether you want to bring more DIY and unique decor into your home, are looking for an easy way to unplug, or want to teach your kids a screen-free skill, a potholder loom might just be your new favorite hobby!
Have any questions about making a DIY loom potholder? Feel free to ask in the comments below!
Stay well,
Maggie
This post was all about the best loom for beginners and how to make a loom potholder.
Other beginner crafting posts you may like:
Easy Step By Step Guide On How To Make Clay Keychains
Beginner Guide to Easy Clay Candle Holder Ideas You Have To Make
17 Creative Solutions For How to Organize Kids Art Supplies
Easy to Recreate Backyard Cornhole Board Ideas For Outdoor Fun
If you would like to save this beginner loom potholder tutorial for later-Pin it!